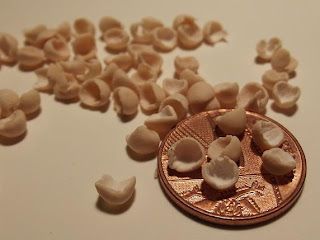
I have been fascinated by the little touches many artists add to their miniature scenes... the most amazing are little broken egg shells. So... of course I had to give it a go too :)
Firstly, I mixed polymer clay: 1 part light brown, 2 parts white, 3 parts translucent. I rolled this well-mixed egg shell colour on number 4 of my pasta machine (1=thinnest, 7=thickest).
Next I rolled out some plain white clay on a number 1. I did try a half and half mix of translucent and white, but this didn't really work as well as the white on it's own. I laid the white onto the egg shell brown, and once again put this through the pasta machine on number 1. I don't have a photograph of this, because my camera refused to take a picture...I begged, cajoled, and eventually swore at it - but it just didn't like my egg-shell clay rolled out. Anyways...
Next, I laid out the clay and cut circles out of it. I used the plastic cover that protects the end of a new paintbrish - just a little plastic tube that is not quite 2/8ths of an inch in diameter (just over half a centimetre).
I did remember to dip the cutter into a little cornflour (or baby talc) as I used it to stop the circles from sticking to it.
The spare bit of clay that is from around the little circles... I don't discard that. I bake it when I bake the finished eggshells, and then I can use it to make little pieces of broken shell.
I then had to find something with a rounded end... small enough to model an egg shell around...
The end of a paintbrush worked nicely - though later I used an orange stick that I lightly sanded to a rounded end. Once again I remembered to dip the end into cornflour EVERY TIME before I used it to model an egg shell.
Carefully, I picked up a piece of egg shell clay, and placed it onto the end of the paintbrush, white side onto the surface and the brown side outward facing. Cool fingers were a help at this point, as warm hands stick to the clay :) Very quickly, I molded the clay around the end of the paintbrush.
Next, I simply flicked the formed shell off of the end onto a baking tray - I used a silicone loaf tin (which I burned the first time I used polymer clay *lol*). The edges of the shell were quite jagged and rough already - but if I wasn't happy then I'd use my nail or a sharp knife to cut into the edge BEFORE I took the shell off of the end of the paintbrush.
Then all I had to do is bake according to the clay manufacturers' instructions, and I have wonderful little egg shells for my miniature home. Not all the egg shells were perfect (unless you're a genius, really lucky, or a perfectionist I don't think anybodys eggshells would be)... but most were be fine :)
I can't wait to use these on a preparation board... baking cupcakes probably... :)


