Friday 27 January 2012

My Perfect Kitchen?

Well, no... my miniature dolls house kitchen is something I'm quite pleased with, but by no means would it be my perfect kitchen. No washing machine, cupboard space or electric kettle :)
Still, as I said... it's almost complete and I'm quite chuffed with how it's turned out. All I really have to do is add a few touches and some curtains to the window...


I decided on having no coving in the kitchen, and only painted the walls in magnolia with some added texture. The tiles made a nice statement on the far wall... and most of my time was spent on the floor as far as decorating the room is concerned. I liked the paper effect of the flagstone flooring, but wanted something a bit more tactile. So I used ModPodge (satin) and when it was almost dry, I went around each flagstone with a cocktail stick.

Wednesday 25 January 2012

Polymer Clay

I have found the delights of polymer clay... hello Fimo, Sculpey... and Liquid clay that smells so addictive *lol*.
I've discovered that I can make a whole range of 24th scale foodstuffs - vegetables mostly - and do it quite well. The advantage to 24th scale is simply that, although tiny and fiddly at times, you don't need to add the amount of detail that you really have to in larger scales.
However, there are rules...
I have been using oven-baked clay. This type of clay needs to be slowly baked to harden at a temperature of 110 degrees celsius or 230 degrees fahrenheit.
You DO NOT forget whether your oven is celsius or fahrenheit, and promptly put your clay in the oven at 230 degrees Celsius. OOPS! By the way... important information here... polymer clay fumes are poisonous if the clay is heated and burnt!
When making small globes for the centre of cabbages and also tiny candles with itty bitty wicks, you really don't want to spend hours making them, only for your oven (with a bit of added utter stupidity) to do this...
At first, I thought that the speed of 'cooking' and hardening was just because the objects I'd painstakingly spent hours making were so tiny... NO! It was just a few 'senior moments' and forgetfullness. Well, until hubby said "It's a Celsius oven... silly moo!"
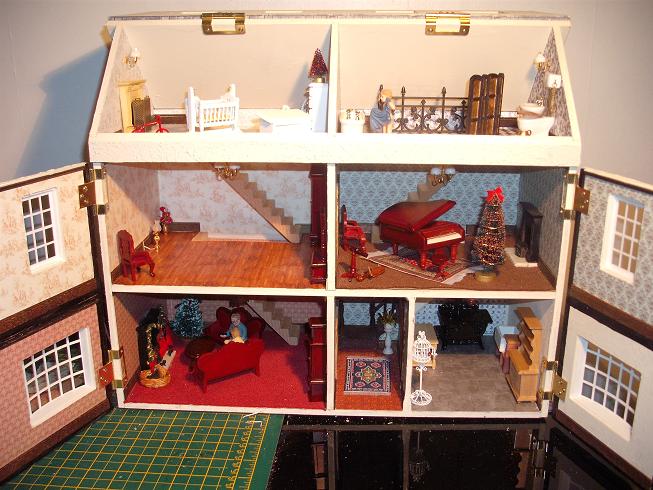
Just to prove that I eventually got something right, here's the candles with a few other things I made...
Now THAT'S better! The christmas pressies had bows and ribbon made out of paper. The box is a cigar box (printed from Jim's Printable Mini's) with tiny cigars inside it too! The newspaper is a copy of the Martha Tabram Jack The Ripper story (I am fascinated with Jack The Ripper). The 'marble' rolling pin and board were made from leftovers, as were the tiny candy canes - which I will have to make again in red and white instead. And then there's the candles... unburnt and uncharred :)

Saturday 7 January 2012

Dollhouse Kitchen

The kitchen is different to all the other rooms in the house, as it is painted over a paper base, and has no coving. I decided to tile the back wall, as this is where the range-oven will be. All the other furniture will probably be moved around... I have no idea exactly where anything is going yet :)

World Globe

It's not brilliant... but I am sort of pleased with the way that my paper and bead world globe turned out.
I didn't have any beads that were green and blue - but thought this one would be just fine.

Electric!

From some of the previous photographs in posts, you may have guessed that the electrics in my dolls house have all been wired in. I am not an electrician! However, I did marry one, and thought that this would be a HUGE help when it came to wiring and electrics. That is not how it happened.
"You're an electrician..." I wheedled at my Darling Hubby
"And the dollshouse is YOUR project" He replied bluntly.
I had to sand grooves in the floors of the dollshouse (I am also NOT a carpenter!), drill holes through the walls, and wire up tiny ickle little wee lamps and bulbs and plugs. It took me two days in all.
I had to strip the larger 12th scale plugs from the lights, and replace them with tiny 1:24th scale plugs.
The tiny wire had to be split and exposed at the ends, threaded up the middle of the plug and folded back into the holes where the pins were to be put in. ARGH!!! This was only slightly more difficult than putting the 2-pin bulbs into the itty bitty lamps.
I also had to build the fireplaces for the 'working' coals and logs, back them with heat-proof paper and thread the bulbs in through the back of the log-effect.
When it was all finished, I plugged in the mains.... and two of the bulbs didn't work!
I had to re-wire those two... but it's all lit up now when I plug it in :)

I know that a multi-coloured lit-up Christmas tree isn't partiularly victorian... but it looks kinda sweet in the corner.

Little Bits Of Paper

Using quilling paper and PVA glue, I made a few pots and bits for the dolls house...


A Close-Up Of The Rooms


A close-up of each of the rooms will show the wallpaper I have chosen, the furniture I've been bought (and bought myself) and some of the staircase construction. Hardest of all was the hallway, as this had to be designed from scratch, and I am an absolute amatuer at this kind of design and building work! Mrs Ames, I'm sorry I didn't think I'd need all that stuff you tried to teach me about angles in Math class! *lol*
CONSTRUCTING THE STAIRS

THE STAIRS IN PLACE

BELLA IN THE LOUNGE - SHE'S NOT ACTUALLY PART OF THE PERMANENT DECOR :)


Getting Decorated

How quickly a month races by!  Of course, with Christmas taking up my time for most of December, I haven't had much time for any crafting whatsoever!  The New Year feels awfully strange - like I'm still trying to get back into the rythym of 'normal' life... maybe everything will be back on kilter by about March? *lol*
Well, the outside of the house was finally completed!
I haven't yet put 'panes' in the windows, and this photograph doesn't show the little letterbox I've since bought and added to the front door. Where I blocked one of the doors, I shall probably make of buy a miniature holly bush... or a winter-white rose bush.
I've also decorated the inside, and have discovered that the wallpaper I design, make, and print off myself is a LOT easier to handle and stick up than shop-bought papers. The only shop-bought paper I used was for the lounge - and there is a HUGE ripple in it at the bottom of the staircase. I tried all sorts of glues - from proper wallpaper paste for dolls houses (not brilliant), watered down PVA (not very adhesive) to just normal, cheap PVA spread as thinly as possible(excellent!).